A molded part can pass dimensional checks, meet cycle targets, and still get rejected for one reason: a visible sink over a rib, boss, or thick section. For OEMs, engineers, and procurement teams, that is not a cosmetic side issue. It affects fit, appearance, customer acceptance, and total production cost. The best ways to prevent sink marks start long before the first production run, with part geometry, tool design, material behavior, and process control all working together.
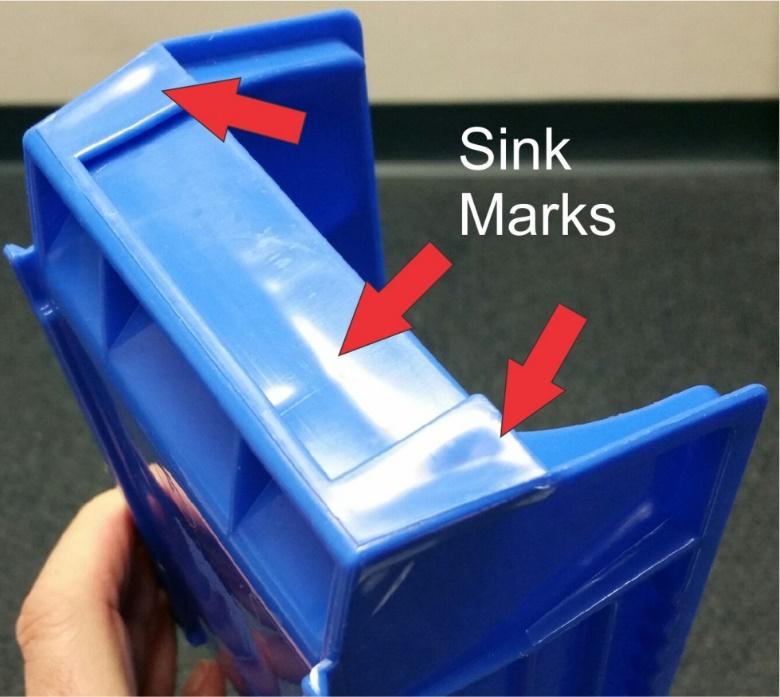
Sink marks happen when the plastic surface pulls inward during cooling because there is not enough internal support as the material shrinks. In injection molding, that usually shows up in thicker areas, near ribs and bosses, or wherever cooling is uneven and packing pressure cannot compensate effectively. The defect looks simple, but the cause is rarely isolated to one setting. Most recurring sink problems come from a stack of decisions made across design, tooling, and molding.
Best ways to prevent sink marks in part design
The fastest way to reduce sink risk is to control wall thickness before the tool is cut. Uniform walls cool more consistently, shrink more predictably, and allow pressure to be transmitted through the cavity more effectively. When wall sections vary too much, thicker zones stay molten longer and continue shrinking after the outer skin has already frozen. That is when the surface starts to draw inward.
Ribs and bosses are common trouble spots. They add strength and assembly function, but they also create localized mass behind the show surface. A rib that is too thick relative to the nominal wall will almost always increase sink risk. In most applications, keeping rib thickness around 50% to 60% of the adjoining wall is a practical starting point. Bosses often need coring for the same reason. If a screw boss is left too solid, the surrounding surface can sink even when the rest of the part looks stable.
Transitions matter just as much as absolute thickness. Sharp jumps from thin to thick sections trap heat and create differential shrink. Gradual transitions, proper radii, and strategic coring reduce material concentration and improve cooling balance. This is one of those areas where a small design revision can prevent a long series of production adjustments later.
There is a trade-off, of course. Sometimes a part needs extra mass for strength, thread engagement, impact resistance, or assembly load. In those cases, the goal is not to eliminate thickness completely. It is to place it intelligently, core it where possible, and support it with tooling and process decisions that account for the shrink behavior.
Tooling decisions that reduce sink risk
A well-designed mold does more than form the part. It controls how pressure reaches the cavity and how heat leaves it. If those two functions are weak, sink marks become much harder to manage at the press.
Gate location is one of the first checkpoints. The farther a thick feature sits from the gate, the harder it is to maintain effective pack pressure before the gate freezes. If the material can no longer feed into that area during shrinkage, the surface may collapse slightly and leave a visible sink. Moving the gate, increasing gate size, or changing gate style can improve pack efficiency dramatically. This is especially true for large cosmetic parts or components with deep ribs and bosses far from the flow entry.
Cooling layout is equally important. Uneven cooling creates uneven shrink, and uneven shrink creates visual instability. Thick sections, reinforced materials, and high-gloss cosmetic surfaces all make this more obvious. Tool designers need to consider cooling line proximity, baffle or bubbler use, steel mass around critical areas, and whether local hot spots are unavoidable due to geometry. If they are unavoidable, the process window needs to reflect that reality.
Ventilation and ejection are not usually the first items associated with sink marks, but they can still influence outcomes. Poor venting may limit fill consistency, and aggressive ejection on undercooled parts can distort the surface enough to exaggerate sink-like defects. The defect may not be purely a sink at that point, but the customer still sees a surface problem.
For high-volume programs, mold trials should focus on more than just filling the cavity. They should confirm whether the tool can sustain a stable pack-and-cool profile under real production conditions. A mold that works only within a narrow, fragile setup is likely to create recurring quality and cycle issues later.
Processing the right way on the molding machine
When the part and mold are fundamentally sound, process control becomes the next lever. Among the best ways to prevent sink marks, proper packing is usually the most immediate correction at the machine.
Packing pressure helps compensate for volumetric shrinkage as the material cools. If hold pressure is too low, or hold time is too short, the cavity will not receive enough additional material before the gate freezes. The result is often a sunken surface over thicker areas. Increasing hold pressure, extending hold time, or both can help, but only up to the point where the gate has already sealed. Beyond that point, more hold time adds cycle cost without improving the part.
Melt temperature also plays a role. If the melt is too hot, the material takes longer to solidify and may shrink more noticeably in heavy sections. Lowering melt temperature within the resin supplier’s recommended range can improve stability. The same applies to mold temperature, although this is more sensitive. A mold that is too hot may increase sink tendency, but a mold that is too cold can create other defects such as poor surface replication, higher internal stress, or filling problems. This is why sink reduction cannot be treated as a single-setting exercise.
Injection speed can influence the outcome as well. A very fast fill may generate more heat and change the pressure profile inside the cavity. A very slow fill may create early freeze-off in some areas and weaken pack effectiveness. The right speed depends on part geometry, resin type, gate design, and cosmetic requirements.
Cushion control and shot consistency should not be overlooked. If the machine is not delivering a repeatable shot size, pack performance will vary from cycle to cycle. On paper, the process may look correct. On the floor, the parts may still show intermittent sink because transfer position, pressure response, or non-return valve behavior is unstable.
Material selection and shrink behavior
Not all polymers behave the same way. Semi-crystalline materials generally show higher shrinkage than amorphous materials, which can make sink marks harder to control in certain designs. Filled grades often reduce shrink, but they may introduce trade-offs in flow, surface finish, wear on tooling, or mechanical properties.
This is where early engineering input matters. If a customer needs a cosmetic housing with tight surface standards, the resin should be selected with shrink behavior and appearance in mind, not only strength or price. If the application requires glass-filled material for stiffness, then the part geometry and tool design need to be adjusted accordingly.
Regrind levels, moisture content, and lot variation can also affect cosmetic consistency. Sink issues that appear to be process-related sometimes trace back to inconsistent material condition. For that reason, defect prevention should include disciplined material handling, drying where required, and validated resin controls.
Why sink marks often require cross-functional correction
Many molding defects can be chased at the machine for too long. Sink marks are one of them. If a part has thick ribs, a distant gate, weak local cooling, and a high-shrink resin, the press operator cannot solve the problem through hold pressure alone. The process may improve the appearance, but it may also increase flash, stress, or cycle time to an unacceptable level.
The most effective approach is cross-functional. Product design should minimize unnecessary mass. Tooling should deliver balanced fill, effective packing, and controlled cooling. Processing should establish a repeatable window with enough margin for production realities. Quality should verify not just visual acceptability, but process stability over time.
That is why experienced injection molding partners review sink risk early, before it becomes a cost problem. In an integrated manufacturing environment such as Glasfil’s, design refinement, tool adjustment, molding optimization, and quality checks can be handled in-house, which shortens the correction loop when a cosmetic or structural issue appears.
The practical standard for preventing sink marks
If you need a working standard, start here: keep walls as uniform as possible, core out thick features, size ribs and bosses conservatively, place gates to support packing in heavy sections, build cooling around thermal hot spots, and validate hold pressure and hold time based on actual gate freeze behavior. Then confirm the material is suitable for the appearance and shrink requirements of the part.
That may sound straightforward, but in production it is always a balance between cosmetics, strength, tooling complexity, cycle time, and cost. The best results come from making those trade-offs deliberately instead of reacting to defects after launch.
When sink marks show up, they are usually signaling something useful. The part is telling you where the material mass, heat flow, and pressure profile are out of balance. Fix that balance early, and the surface tends to take care of itself.
Contact us today to discuss your project requirements or request a quotation. Let’s build a production process you can depend on.